My parents and I had a great brunch at the Limerick Diner. It is definitely the best diner around since most other diners cannot even cook eggs properly. Anyway their menu is quite large and has a great selection. Normally diner’s that try to be that diverse screw up immensely, but this is not the case with Limerick Diner. My mom said she had the best pancakes in her life, and she likes pancakes so I will take her word for it. I had eggs benedict. They had about 7 different kinds, of course the original and even one with a crab cake. I got one with asparagus and tomatoes. I forget what the name was, but it was amazing. The eggs were poached perfectly, the hollandaise (made in house) was amazing, and the asparagus and tomatoes were very tender. Yummm! I didn’t eat the English muffin, because they are just ok and I wanted to save room for the home fries. The home fries were not the best I’ve ever had, I had to use a lot of salt and some pepper, but they were good. My dad had scrapple (which I think is the most disgusting thing ever created) and 2 eggs over easy, with home fries and white toast. Honestly, he gets the same thing everywhere we go but he said it was really good.
They have a TON of veg friendly and meat friendly options, so I will be back for breakfast and I will definitely make it a point to have lunch and dinner there.
Wednesday, April 28, 2010
Manayunk Brewfest

So we made our yearly trip to Manayunk brewfest. We always take the train into Manayunk so there is no drinking and driving, which is why we LOVE this brewfest. We also love it for the short lines and the variety of breweries. I must admit this year I was HIGHLY disappointed. This is always our favorite brewfest. However, this year there was ½ the amount of breweries there. Oh and NO VEGGIE BURGERS!!!!! I paid 50 bucks for a shitty t-shirt, a tasting glass and what seemed like 10-15 breweries. It was a big rip off. Apparently the old brewer was a vegetarian, so he always made sure there were veggie burgers, but since he is no longer there, the jerks that run the brewfest only had pretzels for vegetarians. I was so angry at this fact that I ended up not eating during brewfest and getting some pizza across the street when brewfest was over. Victory was there and their beer was yummy, and Mackenzie’s which is a local brewery was also good. Lancaser had their strawberry wheat and that never disappoints me, but all in all it was a big waste of money. I will have to take this into consideration when next year rolls around. Hopefully one of the other brewfests this year will make up for this disappointment!

Butterflies Healthy Food

I met a friend on Friday night at Butterflies Healthy Food in Skippack. They have a very unique menu that changes daily. They always have soups, salads, free-range organic meats, veg, and vegan entrees. They never use cows milk, processed and bleached flour, hormone treated meats, pesticide managed fruits and veggies. I was highly impressed since this is a restaurant that shares the same values as I do!
We ended up starting out with pineapple smoothies which are made without milk or sugar so it was like a bland slushy. I wouldn’t recommend this; I would actually get one of their iced teas next time. For dinner I had the black bean soup, which was pretty good and a salad. It had mixed greens, mint, sprouts, the best tomatoes ever, carrots, snap peas, red and orange peppers, cucumbers, slivered almonds, ground flax, chia seeds, and pineapple. There might have been some other stuff in it, but that is what I remembered. It was honestly the best salad I’ve ever had. Who ever thought all of those ingredients would come together so perfectly! I got 2 dressings on the side. One was a cilantro lime, and the other was a sesame ginger. I preferred the sesame ginger, but they were both good. My got seafood chowder and she said it was very good. Other menu items that I remember were: mushroom soup, lentil soup, fruit and goat cheese salad, bison burger, bison hot dog, turkey tacos, mushroom ravioli, and a few veggie stir fries.
After we talked and digested for a while we decided to get dessert. They had 2 different kinds of “cheesecake” and we couldn’t decide on which one, so we got both. They are actually raw food which means that nothing is cooked. They were also vegan, so there was no dairy or honey in there. We looked at the ingredients and they were all wonderful but I only remember some of them one had a raw almond crust and the other had raw walnut crust, both crusts were delicious. I do know that the coconut key-lime contained lime juice and lest, coconut, and avocado. The mango contained, dehydrated mango, but I cannot remember the rest of the ingredients. They were both wonderfull, but we agreed that we like the texture of the key-lime better because it was closer to the texture of an actual cheesecake. The avocado just made it amazingly silky. They were both rich and delicious and a much healthier alternative to cheesecake. If you go there, try one of their cheesecakes, you won’t be disappointed.
During dessert we ended up talking to a couple. It was funny because her husband assumed that since the stuff was organic it would taste differently. It does to a certain extent, but mainly because everything is fresh and there are no additives like you get in “normal” American restaurants. I guess our bodies are just used to the highly processed stuff. I never really got hooked on processed crap because my parents didn’t give it to me so for me it was easy to change over to all natural and vegetarian. I guess my point is this café may not be for everyone because it doesn’t have our normal msg, high fructose corn syrup, and other additives, but it is definitely a keeper for me! I think it is important that there is a restaurant that offers meals that person like me can actually eat. Oh and it’s a BYOB so next time I will be bringing some booze.
Artichokes and Oven Roasted Chicken Thighs
I’m back! Last week I ended up with a stomach bug and who really wants to cook or eat when they aren’t feeling well. So I pretty much stuck to soup, rice and other sick people food. So that’s really nothing to blog about.
After I was feeling better, which was later on in the week, I made artichokes and roast chicken thighs. I didn’t get a chance to blog about it because we were quite busy this weekend.
Artichokes
It’s funny, Dom and I have been eating these fresh artichokes our whole lives and I never realized that other people didn’t eat them until college, I guess. See we both grew up in Italian households, so artichokes were a staple in our lives. Sure people eat them in pastas and over chicken in an Italian restaurant, but unfortunatly, few have tried fresh artichokes. There are tons of different ways you can make them.
My parents stuff them with Italian breadcrumbs and locatelli cheese and boil/steam them in about inch or two of water, garlic, and vinegar, making sure not to cover them with the “broth” completely so that the stuffing doesn’t come out. Dom does not like his stuffed and apparently only likes vinegar and water (he just told me this last week). I normally trim mine up and boil them in balsamic, red wine vinegar, evoo, garlic, and sometimes a few slices of lemon. Then I dip in extra balsamic vinegar. I really like the vinegar taste but I wanted to try something new. One time I tried just boiling them in water with fresh sliced lemons and some fresh lemon juice. I served them with lemon butter alla Julia Child. However, I don’t like to dip things in butter, I never have. I tried the sauce and honestly I think it just tasted like lemon butter, so it didn’t appeal to me. Dom liked it (he loves butter) but we agreed to go back to vinegar.
I saw the movie Julie and Julia. She made artichokes and then dipped them into Hollandaise and the look of Julie’s face when she eats the artichoke made me want to try it. Then reality set in and I remembered my lemon butter experiment… what to do?? Hollandaise is hard enough to make and it does contain a ton of butter. Would I even like it? Dom and I love eggs Benedict, but we limit our consumption because it is loaded with calories. I decide against making it, it takes much more time to make, and since I was getting over being sick, I wasn’t up to it. Anyway, I hope you all try artichokes they are delicious, nutritious, and fun to eat!
1 Artichoke per person
Start by trimming your artichokes. Cut a bit of the top off maybe like ¼- 1/2 an inch. Remove some of the bottom leaves if they don’t nice. Cut the stem off and cut off the bottom part of the stem. Do not throw the stems away, inside the stem is just like the heart and it’s delicious. Place your artichokes and stems in a large pot add about 1-2 inches of water depending on how large your artichokes are. To the water add about ¼ cup of red wine vinegar, a few splashes of balsamic, a few splashes of evoo, salt and pepper, 4 cloves of smashed garlic, some Italian seasoning (I will omit this next time I make this recipe because Dom doesn’t like it), and then drizzle some balsamic over the artichokes. Cover the pot and cook until the bottom of the artichoke is soft and tender, this is anywhere from 30 mins to an hour. From time to time I like to ladle the vinegar mixture over the artichokes. You could just boil the artichokes if you want, but I think they would just end up floating to the top so I just do it this way, since this is the way I was taught. Once the artichokes are done take them out of their broth and let them cool enough to handle. Once you are ready to eat begin by peeling off the leaves. This is where you would dip into balsamic (good quality), lemon butter, or hollandaise. Use your teeth to pull the flesh off the leaves. Once you get to the choke, take a spoon or fork and make sure to clean out all of the little “hairs” or they will irritate your throat. Enjoy!

I ended up being full after the artichoke, which was probably due to me being sick in the beginning of the week but I would suggest serving these as apps for any Italian chicken dish or pasta dish.
To go with the artichokes I roasted some chicken thighs for Dom.
Oven Roasted Chicken Thighs
1 package of bone in skin on Chicken Thighs (4)
S + P to taste
Italian Seasoning
Your favorite grill seasoning (he likes Omaha Steak Seasoning)
Evoo
This is a super easy dish that takes no time at all to prepare but tastes wonderful! The best part about it is that you can add a variety of different herbs and spices each time to change the flavor. First I get a square pyrex and I put the thighs in it. Then I season each side with s,p , Italian seasoning, and Omaha

Some other ideas:
Add some potatoes and carrots to this mixture for a one dish meal.
Some other spices that are wonderful to add
Cumin
Coriander
Curry
Cayenne
Red pepper flakes
Rosemary
Thyme
Tarragon (I would use some butter with this)
Be creative with your chicken and have fun!
Wednesday, April 14, 2010
Watercress Soup
I was at Whole Foods doing my weekly grocery shopping and I saw watercress. It looked interesting and although I’ve never eaten it, and definitely never cooked with it, I bought it and figured I would just look into what to do with it later. If you haven’t noticed I will try anything once. My parents always encouraged me to try new things; they would always say how do you know you won’t like it if you don’t try it, so I always tried it, whatever it may be. In the past I have tried venison, rabbit, wild boar, escargot, and a ton of different veggies. I’m also that way with cooking, it doesn’t matter that I’ve never eaten it, never cooked with it, and never seen it on a cooking show, if I want to make it, I will. Sure I have to do a lot of “research” and I may discover I do not like things (rutabagas), but I learn so much when I cook creatively. I get that from my dad, growing up we were always calling him Chef Tell. When he was cooking he would add all kinds of stuff, we were making bacon and onion pizza well before bacon was even available as a topping for pizza (my mom always hated that pizza). He could never cook from a recipe. Well he would start with a recipe, but then add his own flair. Something I didn’t appreciate at the time, which is funny because now that’s the way I cook. I tend to follow my family recipes closely because clearly I’ve grown up with them and I love them, but when I find something new, it’s no holds bar. I love the challenge of creating something new and different. Unless we are talking baking! I rarely mess with baking, you need exact amounts of everything or baked goods will turn out horribly.
Anyway back to my newest experiment. While researching, I found out that watercress has its own website. A veggie with a website, that’s pretty awesome in my book! I found out that it is really nutritious, so I was really excited that I bought it. I looked at a ton of recipes and decided I wanted to make a soup. It was rainy and gross yesterday, so it was the perfect day for soup. One recipe that caught my eye was an awesome Indonesian soup with chunky PB. However, I wanted to actually taste the watercress since I’ve never had it. So I found traditional recipes for watercress soup. Most of them called for 2 bunches of the stuff or more, but I only had 1 bunch, so I basically created my own recipe. I tend to take the best parts of each recipe (in my opinion) and that’s what I cook. Most recipes called for cream or half and half. I wasn’t going to buy cream since I would never use it, but I did have some milk on hand. My recipe has about 2-3 servings. I would say it was good as a hot soup, but I am going to try it chilled for leftovers. It definitely converted me into a watercress fan and I will be trying some new stuff in the future.
Ingredients:
1 ¼ cup of potatoes peeled and chopped
¾ cup of onions peeled and diced
1 clove of garlic diced
2 tbs of butter
Dried Thyme
Dried Italian parsley
1 ¼ cup of water (you can use veg stock or chicken stock here, but I don’t really like boxed veg stock and since you have garlic and onions your pretty much making a stock anyway. If you think about it back in the 1800’s or whenever this was created, do you really think they whipped out a box of stock? They certainly didn’t have any homemade stock in the freezer)
1 bunch of watercress stems and leaves chopped (remove the roots)
Salt and pepper to taste
½ cup of milk room temperature
You will need a blender for this recipe, preferably an immersion blender.
In a medium pot over medium heat melt the butter then add the onions. Cook for about 2 minutes then add the garlic and cook until the onions and garlic are soft. Then add a few dashes of thyme, Italian parsley, salt and pepper. Then add your potatoes and water. Make sure you have enough water or stock to cover the potatoes. Cover the pot and bring to a boil. Once at a boil bring it down to a simmer. You want to cook the potatoes until they are very tender (think mashed potatoes). While the potatoes are cooking wash and chop your watercress. Then turn the pot down to low and wilt in your watercress. My potatoes soaked up almost all of the water so I had to add more. Cook them about 2-3 minutes or longer depending on the size of your chop, you don’t want them to get mushy though and you don’t want them to loose all of their nutritional value. Then take the soup off the heat and blend it until it is smooth and creamy. You don’t want any lumps, so this will take some time. Once it is creamy, add your milk and turn your burner on low. Cook for 2-3 minutes then serve. You could cook it longer and reduce it further, but I don’t like mushy greens and I certainly like keeping the nutritional value. Plus it was an awesome green color and the more you cook green items the browner they turn.
The watercress is a little spicy so you do not have to add as much black pepper as with other soups. It is not bitter like other greens and it has a great flavor. The butter added richness to the dish and the potatoes added a lot of creaminess. A lot of recipes called for more cream or milk, but I kept mine in a small amount to keep the calories down. Also, cream would have made it more luxurious but that’s not what I was going for, but do your own experiment.
Hopefully this will encourage you to go out and try or make something new! Unfortunatly, my husband would not try it. He is getting more adventurous, but he still has his reserves, especially with veggies.

Grilled Portabella BBQ with a side of Grilled Broccoli
I was talking to my mom the other day and she said she had made barbeque. We call it bbq, but some of you may know it as sloppy joes. I got a huge craving…I loved her bbq and I haven’t had it in probably two years. Then I remembered that Rachel Ray made a veggie version. I read her recipe but I liked my mom’s version better, I called my mom and asked her what was in it but I didn’t get exact measurements so I just eyeballed it all and added what I thought should be in it. This recipe is only for 2-3 servings so I would get a big pack of portabella mushrooms if you plan on making it for more people.
Ingredients
2 large portabella mushrooms
½ a medium onion diced (any kind you like)
½ a medium pepper diced (I used a red bell)
2 cloves of minced garlic (you could also grate it in or use a garlic press but keep in mind the smaller the chop the less cooking time)
Evoo (enough to coat the mushrooms and enough to sauté the veggies)
1 tbs butter
2 tsp spicy brown mustard (or whatever mustard you have)
1 ½ tsp of brown sugar
2 tbs of white vinegar (you can use red wine if that’s all you have but I like traditional bbq with cider, malt or white vinegar)
Salt and pepper to taste
Enough ketchup to make a sauce about 4 times around the pan (try to use natural ketchup made with sugar or agave not high fructose corn syrup)
I used silverware instead of measuring spoons so they do give different measurements, however when you are cooking, especially a sauce like this you do not need to be exact. First wash your bellas (everyone says with a damp paper towel, however I watched Alton Brown, he’s part scientist part chef and he did an experiment and washing them with water and giving them a good scrubbing does not cause them to take on water so wash away. Plus they grow mushrooms in manure so I suggest using a lot of water). After drying them (I kept the stems on for this recipe), I drizzled them with evoo and salt and pepper. I cooked my bellas on the grill to give them a meatier flavor. Grilling also helps get rid of some of that moisture content. I grilled them on a foil grilling sheet that contours to the grill, I believe we get them at Lowes. My husband and I started using them to reduce grill cleaning although, everything tastes better right on the grill. They are great for strict vegetarians/vegans because meat products and veggie products alike do not touch the grill. These take about 5-7 mins on each side depending on the heat of your grill and the size/thickness of your mushrooms. Let them out there to grill but check on them especially if this is the first time you are grilling this season. Then in large pan add enough evoo to coat the bottom of the pan and 1 tbs of butter (butter really brings out the meaty flavor of mushrooms, but if you want to keep this vegan leave this out and sub in a non-hydrogenated spread), put on the pan on med-high. Once the butter has melted into the oil add your onions and peppers to the pan and sauté for about 5 mins , stirring frequently. Then add in your garlic, turn your burner to medium-low. I find that garlic burns really easily so if you mince it or fine chop it and add it later to your cooking it works much better than adding it right away. Don’t forget to add some salt and pepper. Sauté that until the onions are translucent and the peppers and garlic are soft. This should happen while you are taking the mushrooms off the grill. Let them cool enough to handle, and then chop them to bite sized pieces. Add them to your pan and mix with the veggie mixture, turn the burner down to low. (Keep in mind I am using a gas stove and gas and electric cook differently so make sure you get a good feel for your stove before you start cooking and unfamiliar recipes). Then add your mustard, ketchup, brown sugar, and vinegar. Cook until the sauce is thick and rich. You can put this on a roll or a bun and eat it like a beef bbq sandwich, you could make a toasted garlic bun and eat it open faced, or eat it as is. I really wasn’t in the mood for a bun and I didn’t have any Ezekiel buns or rolls in the freezer so I just ate it without it, and it definitely satisfied my craving. You can also top it with whatever you top your bbq with, pickles, cheese, or whatever your heart may desire.
To make this for 2 meat eaters just sub out a ½ lb of ground beef, turkey, or chicken for the 2 portabellas Then you would brown the meat with the veggies and you would also reduce the amount of evoo and admit the butter, unless you like butter then go ahead and add it. My mom always used ground beef, but use whatever meat you like. If you want to make a whole lb of meat just double all of the other ingredients. I didn’t make the meat version for Dom because he has a ton of leftovers from this weekend and we both hate wasting food.
Grilled Broccoli
Ingredients
2 small stalks of broccoli ( I would make more if I was feeding more than 2-3 people and depending how much you like broccoli, it’s great left over)
Evoo
Salt and pepper to taste
I made grilled broccoli for my side. Yes you heard me grilled broccoli, it was amazing. I make roasted broccoli in the oven all of the time, but I always manage to set off the fire alarm. So I figured grilling it would be a good alternative, especially since Rigley really hates the fire alarm. Plus I was using the grill for the portabellas anyway. First wash and dry your broccoli stalks. You can grill them with the large stalks by quartering the broccoli if you like, but I don’t like the large stalks and that takes a lot longer to cook. So I just segmented the broccoli into little “trees” trying to keep them about the same size. Then I put them in a bowl and tossed them with evoo and salt and pepper. You want to use enough evoo to coat the broccoli, you’re going to need a lot more for broccoli since there are a lot of edges that can stick and burn. I sometimes add Italian seasoning or other herbs but I wanted really simple grilled broccoli so I didn’t add anything. To grill them I used a special grill pan that is designed for fish and veggies and just has little holes in it so the food doesn’t fall into the grill and cause a fire. If you do not have one of these simply use foil straight on your grill or a foil pie pan. You want to keep them uncovered. With the grill on high (to get it started), then reduced to medium, and then low on their side I’d say they took about 10-15 minutes to cook, but you really want to watch veggies on the grill, if it is not hot enough they’ll cook for so long that they turn into mush, if it’s to hot they burn. I like my roasted broccoli a little brown, but if you want yours less brown I would blanch them first in salted water and then just grill them on low for a few minutes to get the grilled flavor. You can top the broccoli with parmesan or your favorite hard cheese, lemon juice/ zest, or a nice rich sauce would do, but like I said I wanted to keep it simple. Oh and Domenick doesn’t eat broccoli so I try to make it when he’s not around or I make some other veggie for him.

Monday, April 12, 2010
Red Velvet Cake
So I asked Domenick what kind of cake he wanted for his birthday, which is a yearly question that has resulted in chocolate cake with pb icing (a personal fav), rocky road cupcakes (awesome), chocolate cupcakes with vanilla icing as well as some other creations. This year he wanted Red Velvet Cake with vanilla icing. I have to admit that I have never made a Red Velvet Cake, so I had to do a lot of research. My main issue with making this cake was that I cook naturally, which means no artificial colors, flavorings, preservatives, and other crap like that. Oh and I always use unbleached flour (preferably organic), cage-free eggs (preferably organic), organic sugars, and humanely obtained, if not organic dairy products. So my challenge with this cake was the red color. It turns out that there wasn’t always food coloring added to give it the red color that we have come to know and love. The reason it was red was that the cocoa , which wasn’t dutch processed at the time, reacted with the buttermilk and vinegar. It doesn’t get the bright blood red but instead a reddish brown hue. Then when cocoa became dutch processed (adding more alkaline) people started adding food die to the cake either by making their own die by adding beets to the batter, by boiling beets and using the water from it, or using artificial food coloring. I know my husband, and there are very few things he despises more than beets, so making my own color was out of the question. I shop at Whole Foods and I know they carry natural dyes so that was my first choice. So I went to WF’s and guess what, they were out of dyes, apparently Easter had wiped them out and they were unable to get more dye in. I was planning on getting the non-dutch processed cocoa anyway so I began looking. My Whole Foods carried 3 brands of cocoa powder. One was clearly marked dutch processed so that was out. The second was organic Green and Blacks. It didn’t say it was dutch processed but it did contain alkaline. Since their chocolate is a bit bitter for me, and the cocoa had a ridiculous price tag, I decided against it. The next was Ghirardelli unsweetened cocoa. It stated that it only contained roasted cocoa. I did a search on their website and it looks like their sweetened ground chocolate and sweetened cocoa are dutch processed, but it doesn’t state whether or not the unsweetened is dutch processed. Anyway I ended up with Ghirardelli unsweetened cocoa because I love their chocolate.
I found a recipe for Red Velvet Cake online but I doctored it up a bit. I did not add the food coloring simply because I did not have it, I added more vanilla because I normally do, and I added way more cocoa (it only called for 1 tsp can you believe that??). I also baked it in a 9 x 13 because I did not have 2 round cake pans or a carrier for a round cake. It took a lot less time to bake than it said it needed so I would keep an eye on it if you decide to make this cake.
Before we start I must mention that everything must be room temperature when baking. I honestly have heard a dozen reasons why, but for me, you do not question the authority of your elders/professionals on baking. A quick way for dairy (milk, butter, etc) to get room temp is a low setting on the microwave. For eggs put them in some warm water (not hot) in their shell, until they warm up. If they make the water cold just replace it with warm water. Also when it comes to baking be prepared for everything and anything to happen; a cake flopping, crust burning, batter spilling, etc.
Red Velvet Cake
Ingredients
• 1 cup vegetable shortening ( I used spectrum organic since it’s non-hydrogenated)
• 2 eggs
• 1 1/2 cups sugar
• About 6 teaspoons cocoa powder (the recipe called for 1 so use as much as you like/need. I needed to keep adding more for the color and plain red velvet cake is pretty bland hence the traditional cream cheese frosting)
• 2 ounces red food coloring (I didn’t add any but if you would like to add it)
• 2 1/2 cups cake flour (about that, I do not have cake flour, which is simple to make by subtracting 2 tbs of sifted flour and adding 2 tbs of cornstarch to the measurement of all purpose flour but I didn’t have cornstarch so I just used organic unbleached flour and it turned out fine. My personal feeling is that there is no need to invest in fancy flours when you can make them at home)
• 1 teaspoon salt
• 1 cup buttermilk
• 1 teaspoon vanilla extract
• 1 teaspoon baking soda
• 1 teaspoon vinegar
Directions
Preheat oven to 350 degrees F. In the bowl of a mixer, cream together the shortening, eggs and sugar. In a separate small bowl, mix together the cocoa and food coloring (I skipped this step). Add the paste to the shortening mixture. Sift the flour and salt together over parchment (I did this in a bowl). Add to the batter alternately with the buttermilk in 3 additions. Add the vanilla extract. Fold in the baking soda and vinegar.
Here’s where the recipe differs:
Actual recipe: Pour the batter into 2 greased 9-inch cake pans. Bake for 30 minutes or until an inserted cake tester comes out clean. Let cool on a cooling rack. Invert the cakes from the pans.
My recipe: Pour the batter into a greased 9 x 13. The batter is quite thick, so it doesn’t exactly pour and you will have to spread it evenly with a spatula of some sort. Bake for 23 minutes or until a cake tester comes out clean. Cool on a cooling rack.
White Frosting:
• 2 tablespoons flour
• 1 cup milk
• 1 cup unsalted butter
• 1 cup confectioners' sugar
• 1 teaspoon vanilla extract
Over medium heat, cook the flour and milk until thickened. Let cool. In the bowl of an electric mixer, cream together the butter, sugar and vanilla until light and fluffy. Beat in the flour mixture. Frost the top of the first layer with frosting and set the second layer on top. Frost the entire cake with remaining frosting.
So here’s a fun little story: I have never made cooked icing of any sort and I’ve heard what a pain it was, and let me tell you it was! The first time I added the flour to the milk and cooked it over medium, apparently I didn’t stir it enough, which means the entire time you are cooking it, so it ended up lumpy. The next time I was successful but when the recipe means until thickened it meant a lot longer and a lot thicker than I got it. So I basically had a ton of sort of thick milk which means one super soupy icing! So I stuck a stick of butter in the microwave enough to soften it, added flour, powdered sugar and more vanilla, creamed it and then gradually added back in the soup mixture. It worked out fine and tasted good, but pretty much like my moms no cook version, so I will NEVER be making this version again!
I didn’t bother taking a picture of the entire cake because the cake wasn’t decorated. I normally fancy up cakes, especially bday cakes by making some fun shape (I’ve done a martini and a marlin, yes the fish, my dad fishes), by icing with different tips, writing on it, adding shavings of chocolate or cookie crumbles, and/or dyed icing, but we were pressed for time so I just simply iced the cake with a spatula. It definitely tasted the same but it would have been nice to have been able to spruce it up a bit.
I brought the cake to Domenicks parent’s house and everyone seemed to like the cake especially Dom!
PF Chang's
Since I love good food and cooking, I pretty much hate chains. They tend to have horrible food, food that is bad for you, and little or no veg options. However, PF Chang’s does not fit in my normal description of a chain. Their food is good and there are healthy options. Not all are healthy though, so be careful if you are watching your weight (nutrition facts can be found on their website http://www.pfchangs.com/menu/NutritionalInfo.aspx). PF Chang’s has got to be one of the best chains out there for vegetarians and their meat-eater companions. Their vegetarian menu is much more extensive than most places and a lot of their appetizers and sides are vegetarian as well. Plus when I was eating meat, I loved their chicken lettuce wraps and they make a veg version with tofu that is awesome. They also have a lot of meat and seafood options so that everyone is satisfied. They are sharing portions so be prepared, and if you are the only vegetarian you will be leaving with leftovers.
This Saturday we went out to PF Chang’s with a few friends for Domenick’s birthday. I started out with the veg lettuce wraps and they were delicious, as always. I normally get Buddha’s feast with brown rice, but I really wanted fried rice so I got veg fried rice without the egg. Sometimes the fried egg flavor is too intense in fried rice for me. It was very good so I would highly recommend it. A few people tried my veg lettuce wraps and my veg fried rice and they agreed that they were tasty and that the veg lettuce wraps were a close comparison to the chicken version. See, I don’t have to miss out on everything by being a vegetarian!
One thing I highly recommend is the Asian Pear Mojito! It is one of my favorite drinks of all time. They also have good wine and flights (tastings) when you’re in a wine mood. Other winners for the night were the crispy green beans (one of the few things I could try; they were the best fried green beans I’ve ever had), dynamite shrimp, chicken lettuce wraps, and pork fried rice. I do not remember what other people had, but those are just the few people raved about. From past personal meat-eating experience their Mongolian beef is AMAZING and their almond cashew chicken is good too. If you are like me and don’t like chains I suggest you give this one a try, sure it’s not going to be the best food of your life, but it’s a good chain with a ton of options.
Saturday, April 10, 2010
The Drafting Room
Last night Domenick and I met up with some friends at The Drafting Room. We love the beer there and we like the food too. The last time we were there I just had a salad and the other few times we were there I was still eating meat and fish. Unfortunately, the only items on their menu that are veg friendly are nachos, a salad or two, and a portabella burger. Last night I wanted something more than a salad. Also, I was not in the mood for a portabella burger since I resort to eating them often at restaurants and I definitely did not want to make nachos my main meal. I did however; get the nachos as an app, which was good because they had veg refried beans on them for protein. For dinner I ordered a baked sweet potato and grilled asparagus. I know weird dinner, but I like to eat stuff other than mushrooms and salad when I go out and I love asparagus and sweet potatoes. They were offered as sides to meat and/or fish entrees so I had to ask for them as my meal. I actually wanted to try the cajun rice but it was made with a meat stock, so I couldn’t get that. They were accommodating though and offered to make me a veg dish, but I didn’t feel like eating a veg pasta last night. I was happy and satisfied with my simplistic meal.
I do highly recommend the beer I drank, Peak Organic Nut Brown Ale and Terrapin Wake N Bake Coffee Oatmeal Imperial Stout . They were both amazing!
My menu options are very limited since I do not eat meat and rarely eat fish, but I’m very flexible and I love sides so I’m normally able to get something. If you are in the same boat, I would suggest getting the sides with the butter on the side and also avoid things like mashed potatoes and mac n cheese since restaurants tend to add a lot of calories to these dishes. For me, I like to stick to baked potatoes of some sort, rice, or pasta and grilled or steamed veggies. Pretty much every restaurant including steak houses will accommodate vegetarians or vegans; you honestly just have to ask. I hope that helps some of you that are vegetarians living in a carnivore’s world.
Wednesday, April 7, 2010
Leftovers
Lets face it you either love them or hate them! But if you try to get creative leftovers can take you places you never knew you could go!
After cooking on Easter Sunday we realized the recipe (actually more like jotted down notes) made 2 pies instead of 1 (don't worry the recipe in my blog only makes 1 pie). So my mom made too much orzo, ham and wheat berries (she made these items the night before) so we had a ton of leftovers. I took the orzo that was cooked in water, some wheat berries and some ham.
A few days ago I ate about 1/2 cup of the wheat berries with 1 tsp of honey (good raw honey) and it was delicious and really filling. It was super easy to make at work in the microwave and a nice break from oatmeal. I suppose you could put them over yogurt with some flaxseed or eat them with dairy or non dairy milk like a cereal. They are nice and hearty, but since we had so many leftovers I froze the rest.
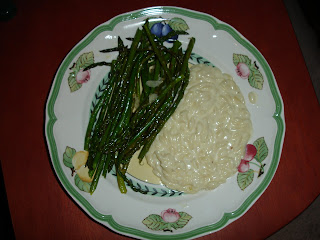
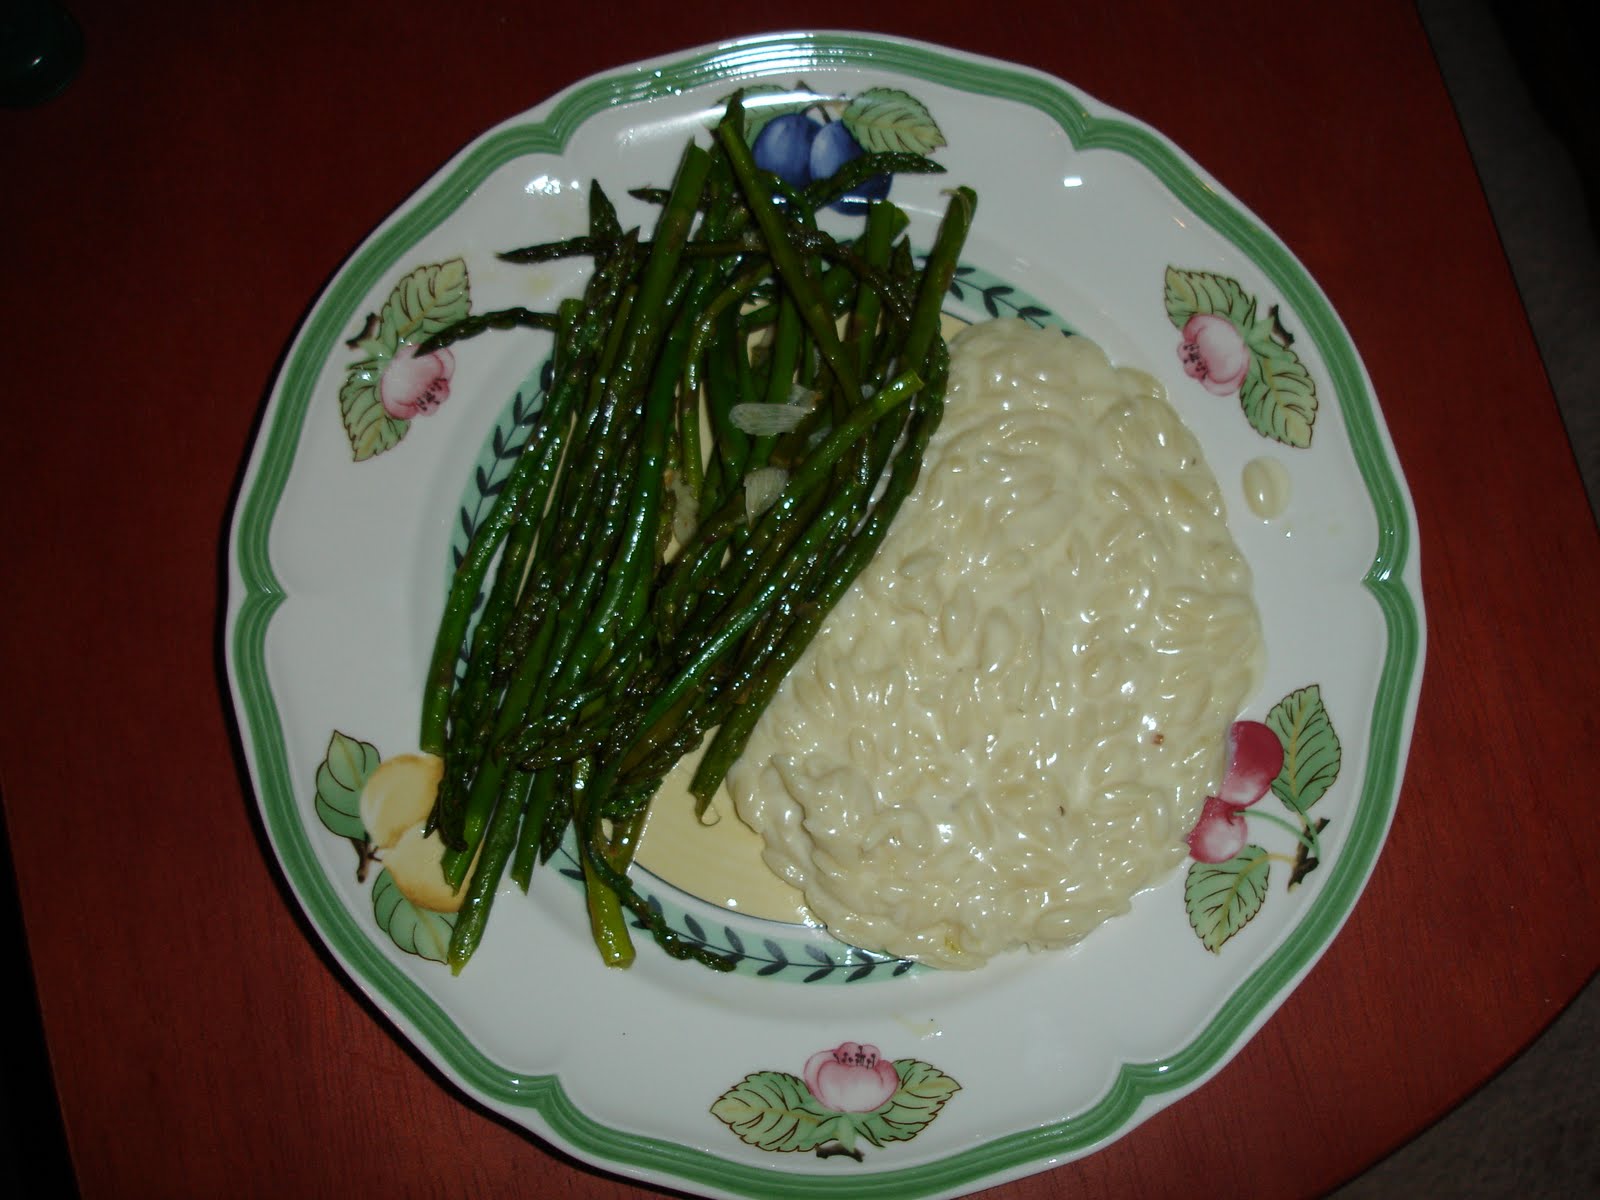
Now what to do with the orzo and ham? Well my mom bought me beautiful skinny asparagus and I like to use fresh veggies right away because the longer you keep them the more they lose vital nutrients. I figured I could make Mac N Cheese since I had a lot of cheese in my fridge and then add the cooked ham in for Domenick (my husband). I always have a bunch of cheeses on hand, which is good for simple suppers, or even breakfast or lunch! I had Parmesan and Locatelli but I didn't want an alfredo style and I prefer cream or half and half with my alfredo and I only had milk in the fridge. I also had an Italian cheese that was semi-hard and similar to a good aged provolone, which we all know doesn't melt well, so that was out. I had baby swiss, but that was a little too mild for a cheese sauce and I would need far more cheese than I had to get a real swiss flavor. Then I thought I have smoked gouda, PERFECT it will give me a smoky flavor so I won't miss the ham and it will also compliment the ham. I also added some sharp cheddar just to cut the gouda because it's such a rich cheese. I also made Asparagus Alla' Susie (my sister in law)
1/2 cup of grated sharp cheddar
1 1/2 cup of milk room temperature
about 3 tbs of butter
about 2 tbs of flour
about a 3/4lb-lb of orzo (sorry it was precooked I have no idea how much I used so I'm just guessing. If you make too much you will have left over orzo if you make to little you'll have left over cheese sauce. So make what you want and you can always add the left over orzo to stock and some veggies and make soup or pour the cheese sauce over steamed broccoli or cauliflower.)
Pepper to taste
First make sure you grate your cheese (It grates better when it is just taken out of the fridge) and keep it handy you don't want your sauce to be ready and then have to grate cheese, trust me I learned the hard way! Put your water on to boil for the pasta and cook according to the directions on the box. Then start the sauce by making a roux. How to make a roux: add your butter to your pan (use a large pan so you can add the pasta to the sauce). Melt the butter on low. When the butter melts stir in the flour until there are no lumps. You want a thickened butter for this sauce, not a paste-like roux you may need to thicken other sauces. Cook the flour taste out of the roux, about 1-2 minutes, and then add the milk. At this point I still have this on low because you do not want to curdle the milk. Stir the roux and milk together with a wooden spoon. Then bring the milk up to medium (do not boil the milk you just want to heat it a little more so that the cheese will melt). Once the roux has mixed with the milk and the milk begins to thicken stir in black or white pepper and then stir in the cheese with a wooden spoon, stirring in a figure 8 pattern (trust me it works). Your pasta should be done (or you could use left over pasta like I did) then drain your pasta and add it to the cheese sauce stirring together to make sure the cheese coats all of the pasta. Take it off the heat and serve immediately.
If you would like to add cooked ham or cooked veggies you would do so when you add the pasta to the sauce making sure not to break up the veggies or the pasta. Since I did not want ham in mine, I cooked it separately, which is a good idea if you like broccoli in your Mac N Cheese and someone else in your fam likes meat. For the ham, you can either cook it in a pan with some spray (it will brown like when making a ham steak), cook it in a pan with a little bit of water, or microwave it. It's your choice. I prefer cooking it in some water that way it doesn't dry out or brown up. Then I add the ham to just his Mac N Cheese. As you can see from the picture I gave him too much but that's ok because he can eat it for lunch at work.
half a lemon
2-3 cloves of sliced or minced garlic (depending on the size of the clove and how much you love garlic, I love it)
about 1 tbs of evoo if the water evaporates and there is not enough evoo to coat your asparagus go ahead and add more
a splash of white wine (I like pinot grigio or sauv blanc for this, but whatever you have on hand will do)
salt and pepper to taste
Wash the asparagus and either break the tough bottoms off using the hold and snap method (for some reason I prefer doing this) or break a few and see where they break and cut the rest. Don't worry about drying them, I like to leave them a little wet so they steam a little and stay crisp (I added this step, Susie dries her so if you want a more cooked asparagus I suggest drying them but you will need to add more evoo to coat the asparagus). After washing and breaking them I add them directly to the pan, like I said before if you want them crisp they should still be a little wet. Heat the pan with the asparagus and add some evoo I say about 1 tbs. Cook for a little maybe 4 minutes on low with a lid make sure to stir it so one side does not get brown while the others stay raw. Then add the garlic because if you add the garlic right away it will burn. I have this awesome product from pampered chef (on my products I love page) that slices the garlic to look like slivered almonds and I always use it when I make this recipe because it looks so pretty. Salt and Pepper to taste, put the lid back on and cook on low if you like crisp asparagus. Please keep an eye on it because burnt garlic is gross! Cook this until the asparagus is almost at the tenderness you want and before the garlic begins to brown. Then add a small splash of white wine and cook the alcohol out. When you take it off the heat squeeze a bit of lemon juice (fresh preferred) on it and toss. Now its done and delicious! You can also add shaved or grated parm but since we were eating it with Mac N Cheese I decided against adding even more cheese.

After cooking on Easter Sunday we realized the recipe (actually more like jotted down notes) made 2 pies instead of 1 (don't worry the recipe in my blog only makes 1 pie). So my mom made too much orzo, ham and wheat berries (she made these items the night before) so we had a ton of leftovers. I took the orzo that was cooked in water, some wheat berries and some ham.
A few days ago I ate about 1/2 cup of the wheat berries with 1 tsp of honey (good raw honey) and it was delicious and really filling. It was super easy to make at work in the microwave and a nice break from oatmeal. I suppose you could put them over yogurt with some flaxseed or eat them with dairy or non dairy milk like a cereal. They are nice and hearty, but since we had so many leftovers I froze the rest.
Now what to do with the orzo and ham? Well my mom bought me beautiful skinny asparagus and I like to use fresh veggies right away because the longer you keep them the more they lose vital nutrients. I figured I could make Mac N Cheese since I had a lot of cheese in my fridge and then add the cooked ham in for Domenick (my husband). I always have a bunch of cheeses on hand, which is good for simple suppers, or even breakfast or lunch! I had Parmesan and Locatelli but I didn't want an alfredo style and I prefer cream or half and half with my alfredo and I only had milk in the fridge. I also had an Italian cheese that was semi-hard and similar to a good aged provolone, which we all know doesn't melt well, so that was out. I had baby swiss, but that was a little too mild for a cheese sauce and I would need far more cheese than I had to get a real swiss flavor. Then I thought I have smoked gouda, PERFECT it will give me a smoky flavor so I won't miss the ham and it will also compliment the ham. I also added some sharp cheddar just to cut the gouda because it's such a rich cheese. I also made Asparagus Alla' Susie (my sister in law)
Orzo Mac N Cheese with Smoked Gouda and Cheddar
1/2 cup of grated Smoked Gouda (a box grater does nicely with these type of cheeses)1/2 cup of grated sharp cheddar
1 1/2 cup of milk room temperature
about 3 tbs of butter
about 2 tbs of flour
about a 3/4lb-lb of orzo (sorry it was precooked I have no idea how much I used so I'm just guessing. If you make too much you will have left over orzo if you make to little you'll have left over cheese sauce. So make what you want and you can always add the left over orzo to stock and some veggies and make soup or pour the cheese sauce over steamed broccoli or cauliflower.)
Pepper to taste
First make sure you grate your cheese (It grates better when it is just taken out of the fridge) and keep it handy you don't want your sauce to be ready and then have to grate cheese, trust me I learned the hard way! Put your water on to boil for the pasta and cook according to the directions on the box. Then start the sauce by making a roux. How to make a roux: add your butter to your pan (use a large pan so you can add the pasta to the sauce). Melt the butter on low. When the butter melts stir in the flour until there are no lumps. You want a thickened butter for this sauce, not a paste-like roux you may need to thicken other sauces. Cook the flour taste out of the roux, about 1-2 minutes, and then add the milk. At this point I still have this on low because you do not want to curdle the milk. Stir the roux and milk together with a wooden spoon. Then bring the milk up to medium (do not boil the milk you just want to heat it a little more so that the cheese will melt). Once the roux has mixed with the milk and the milk begins to thicken stir in black or white pepper and then stir in the cheese with a wooden spoon, stirring in a figure 8 pattern (trust me it works). Your pasta should be done (or you could use left over pasta like I did) then drain your pasta and add it to the cheese sauce stirring together to make sure the cheese coats all of the pasta. Take it off the heat and serve immediately.
If you would like to add cooked ham or cooked veggies you would do so when you add the pasta to the sauce making sure not to break up the veggies or the pasta. Since I did not want ham in mine, I cooked it separately, which is a good idea if you like broccoli in your Mac N Cheese and someone else in your fam likes meat. For the ham, you can either cook it in a pan with some spray (it will brown like when making a ham steak), cook it in a pan with a little bit of water, or microwave it. It's your choice. I prefer cooking it in some water that way it doesn't dry out or brown up. Then I add the ham to just his Mac N Cheese. As you can see from the picture I gave him too much but that's ok because he can eat it for lunch at work.
Asparagus Alla' Susie (my variation)
1 bunch of asparagushalf a lemon
2-3 cloves of sliced or minced garlic (depending on the size of the clove and how much you love garlic, I love it)
about 1 tbs of evoo if the water evaporates and there is not enough evoo to coat your asparagus go ahead and add more
a splash of white wine (I like pinot grigio or sauv blanc for this, but whatever you have on hand will do)
salt and pepper to taste
Wash the asparagus and either break the tough bottoms off using the hold and snap method (for some reason I prefer doing this) or break a few and see where they break and cut the rest. Don't worry about drying them, I like to leave them a little wet so they steam a little and stay crisp (I added this step, Susie dries her so if you want a more cooked asparagus I suggest drying them but you will need to add more evoo to coat the asparagus). After washing and breaking them I add them directly to the pan, like I said before if you want them crisp they should still be a little wet. Heat the pan with the asparagus and add some evoo I say about 1 tbs. Cook for a little maybe 4 minutes on low with a lid make sure to stir it so one side does not get brown while the others stay raw. Then add the garlic because if you add the garlic right away it will burn. I have this awesome product from pampered chef (on my products I love page) that slices the garlic to look like slivered almonds and I always use it when I make this recipe because it looks so pretty. Salt and Pepper to taste, put the lid back on and cook on low if you like crisp asparagus. Please keep an eye on it because burnt garlic is gross! Cook this until the asparagus is almost at the tenderness you want and before the garlic begins to brown. Then add a small splash of white wine and cook the alcohol out. When you take it off the heat squeeze a bit of lemon juice (fresh preferred) on it and toss. Now its done and delicious! You can also add shaved or grated parm but since we were eating it with Mac N Cheese I decided against adding even more cheese.
With Ham

Without Ham
Tuesday, April 6, 2010
EASTER
Last Tuesday I got together with my mother in law and we made Italian cookies with a baked in egg. They are delicious and they are an Easter tradition in their family. I had a great time baking with her but there is no way you can write down the ingredients and then attempt to make them. It is one of those recipes that you have to watch come together. I would have never used as much flour as it needed and I wouldn’t have known to put the egg on the seam if I had not learned from her. Next year I will make them myself and I will get a better description so that I can post the recipe.
Biscotti di Pasqua

Then on Saturday we went up to Pen Argyl to visit my parents and we made Easter Pies. I do have the recipes for them so I will share, well they're not exact either. I guess Italians do not measure. I do have a little story that goes along with these pies. Every year a very near and dear Italian neighbor, Vera, would invite us over when she made the Easter Pies. We loved them so much that when she passed we wanted to share the tradition. So last year my mom made them with her sister. Her sister went to California
Ham Wheat Pie
2 cups of orzo (pasta) cooked in ham broth
½ cup of Locatelli cheese (Italians from my hometown prefer this cheese to Parmesan, but you could use Pecorino Romano, or Parmesan if your grocery store does not carry this)
1 cup of shredded Mozzarella Cheese
1 cup of ham
3 eggs
1 cup cooked wheat berry (You have to soak the wheat overnight and then cook it)
Black pepper to taste
Mix the ingredients together and then put the mixture in a Pyrex and bake at 350 until the top is browned and the cheese is melted.

Spinach Wheat Pie
2 cups of orzo (pasta) cooked in water
½ cup of Locatelli cheese
1 cup of shredded Mozzarella Cheese
3 eggs
1 cup cooked wheat berry
½ a box of defrosted spinach squeezed to remove all water
Black pepper to taste
Mix the ingredients together and then put the mixture in a Pyrex and bake at 350 until the top is browned and the cheese is melted.

Ham Pie
2 cups of orzo (pasta) cooked in ham broth
½ cup of Locatelli cheese
1 cup of shredded Mozzarella Cheese
1 cup of ham
3 eggs
Black pepper to taste
Mix the ingredients together and then put the mixture in a pie pan cover with your favorite crust (whether you buy or make your own) We used store bought and unfortunately it stuck together so I had to roll it out anyway. Bake at 350 until the crust is light brown.

Spinach Pie
2 cups of orzo (pasta) cooked in water
½ cup of Locatelli cheese
1 cup of shredded Mozzarella Cheese
3 eggs
½ a box of defrosted spinach squeezed to remove all water
Black pepper to taste
Mix the ingredients together and then put the mixture in pie pan and bake at 350 until the top is browned and the cheese is melted. I did not use a top crust for mine because I do not like a lot of pie crust.

Sweet Easter Pie
1 ½ lb ricotta cheese
½ tsp salt
1 cup sugar (I used raw organic sugar)
2 whole eggs (cage free organic)
2 egg yolks
2 egg whites beaten until stiff like a meringue
1 ½ cups of cooked white rice
1 teaspoon vanilla
1 tablespoon of lemon zest
Beat the ricotta with the salt until smooth. Then add the whole eggs and yolks and beat. Add the sugar gradually and beat. When the mixture comes together and is smooth add the vanilla. Fold in the rice and zest, when it is completely mixed fold in the stiff egg whites.
I used an organic pie crust from Whole Foods for the base of my Sweet Pie (which was pretty amazing), but you can use your own sweat pie crust if you wish. You can also use a top crust if you like, but for me 1 pie crust is enough.
Bake at 400 for 15 minutes and the 375 for 45 or until light brown. Since I did not use a top crust, about halfway through baking we had to cover the edges with foil to prevent further browning.

Apparently my Italian grandmother made a sweet Easter pie too but hers had pineapple on the bottom..yumm I may have to try that! Of course we do not have the recipe because she is no longer with us so I will have to wing that was well.
As if that wasn’t enough cooking and baking for the night I decided I wanted to make Prune Crumb Pie. A few months ago after eating Raisin Crumb Pie, my mom was telling me a story about a lady who used to make a Prune Pie that she loved. She never got the recipe because she was a kid at the time. So I researched and I couldn’t find anything I liked so I adapted a few different Raisin Crumb Pies recipes to come up with my very own Prune Crumb Pie. Since it was the first time I’ve ever attempted a Prune Pie and had never made a Raisin Pie I winged it a little but it turned out delicious. It was definitely one of the best pies I’ve ever eaten and my parents would agree.
Prune Crumb Pie
1 organic Pie crust from Whole Foods
1 lb pitted pruned halved or quartered depending on the size you are aiming for and since some are larger than others (I love Newman’s Own and I highly suggest getting them especially for this recipe)
1 cup of raw organic sugar
1 cup of water
½ cup of water with about 4 tbs of cornstarch to thicken
Cook the prunes with the sugar and water until thick. If need be add as much cornstarch, first mixed in cold water, to thicken the mixture. Set aside to cool.
Crumb Mixture
1 stick of butter
About 2/3 cup of sugar
About 1 cup of flour
Cinnamon to taste
Mix together with a fork or pastry blender. Add prune mixture to crust and then sprinkle thoroughly with the crumb mixture. Bake at 350 until the crumbs and pie crust are done. I believe it was about 45 mins.
Unfortunately we started eating this before I could take the picture so this is what part of it is supposed to look like.

It was a very wonderful food-filled weekend and we enjoyed every minute of it!
First Post
Hello and welcome to my new blog! I will begin writing about food and posting pictures as soon as I can. I hope you all have fun reading it! I must say I am very excited for this new adventure!
Subscribe to:
Posts (Atom)
